Thursday, 20 October 2011

Controller Extension Steps in OAF


EXTENSION IN OAF
Controller Extension Steps:
Extension Step 1. Rightclick on Project and create new
Name of the Class: extendedHelloCO
Package : oracle.apps.ak.extendCO
Extends: oracle.apps.ak.hello.webui.MyTestCO


Extension Step 2. Add the highlighted lines to extendedHelloCO.java
package oracle.apps.ak.extendCO;
import oracle.apps.ak.hello.webui.MyTestCO;
import oracle.apps.fnd.common.VersionInfo;
import oracle.apps.fnd.framework.webui.OAControllerImpl;
import oracle.apps.fnd.framework.webui.OAPageContext;
import oracle.apps.fnd.framework.webui.beans.OAWebBean;
import oracle.apps.fnd.framework.webui.beans.message.OAMessageTextInputBean;
import oracle.apps.fnd.framework.webui.beans.OAImageBean ;


public class extendedHelloCO extends MyTestCO
{
  public void processRequest(OAPageContext pageContext, OAWebBean webBean)
  {
    super.processRequest(pageContext, webBean);
    OAMessageTextInputBean fieldHelloName =
      (OAMessageTextInputBean)webBean.findChildRecursive("HelloNameField");
    fieldHelloName.setText(pageContext,"Hello Extended Anil");   
  }
}

Extension Step 3. Ensure that personalization is turned on for your username.
This can be done by setting profile "Personalize Self-Service Defn" to Yes
Run the XML page, you will still see "Hello Not Extended Anil"
Click on Personalize Page link on right handside top corner.

Select "Complete View" and "Expand All" Option in personalization page.
Click personalize icon for "Message Component Layout: (MainRNExt)"
Set the controller to "oracle.apps.ak.extendCO.extendedHelloCO" at Site level.


Click on Apply, and then click onReturn to Application.

Extension Step 4. Rebuild project in jDev and run page again.
You will now find that your extension has taken effect
 http://docs.google.com/File?id=dkg3r3j_109gsjmqm


Creation of ViewObject Dynamically...

Requirement:

 I have one seeded page..In that page i have 4 input parameters..and also i have one table...and one apply, cancel and add another button is there. When i provide the values in that page and when i click on "Apply" button, the values has to be inserted into the back-end and as well as the values has to be displayed in the seeded page. This is already there in the existing functionality. Now my requirement is to "When the use provide  values in the same page with same values, now this time i have to through the exception"


Now for this i had done, controller extension..and personalization..so for that i created a dynamic view object and doing some validation..

public void processFormRequest(OAPageContext pageContext, OAWebBean webBean)
  {
    super.processFormRequest(pageContext, webBean);
    stopDelieveryManager(pageContext, webBean);
  }
 public void stopDelieveryManager(OAPageContext pageContext, OAWebBean webBean)
{
//OAViewObject vo = (OAViewObject)am.findViewObject("AddNewProjectPartiesVO");
OAApplicationModule am = pageContext.getApplicationModule(webBean);

// Read the values from the page
String  getApply =  pageContext.getParameter("Apply");
String sDate = pageContext.getParameter("StartDate");
String eDate = pageContext.getParameter("EndDate");
String resourceId=pageContext.getParameter("ResourceId");
OADBTransaction oadbtransaction = am.getOADBTransaction();
String projectId = (String)pageContext.getSessionValue("paProjectId");
String sWhereClauseValue = "";

if(getApply!=null)
{
   
String dynVoQuery = "SELECT distinct ppp.person_id, ppp.start_date_active, ppp.end_date_active FROM pa_project_players ppp,  pa_project_role_types ppr,pa_project_parties pp  WHERE pp.project_id=ppp.project_id AND ppp.project_role_type = ppr.project_role_type   AND pp.project_role_id =ppr.PROJECT_ROLE_TYPE  AND ppp.project_id = :1   AND ppr.description = 'Delivery Manager'   AND  NVL (ppp.end_date_active, NVL (pp.START_DATE_ACTIVE, SYSDATE)) BETWEEN NVL (:2, SYSDATE) AND NVL (:3, TO_DATE ('01/01/4712', 'DD/MM/YYYY'))";

ViewObject validateViewObject1 = (ViewObject)am.findViewObject("AddProjectPartiesVO");

if (validateViewObject1 == null)
  validateViewObject1 = (ViewObject)am.createViewObjectFromQueryStmt("AddProjectPartiesVO", dynVoQuery);

if (validateViewObject1 != null)
{
    validateViewObject1.setWhereClause(null);
    validateViewObject1.setWhereClauseParams(null);

    ArrayList params = new ArrayList(3);
    params.add(projectId);
    params.add(sDate);
    params.add(eDate);
    validateViewObject1.setWhereClauseParams(params.toArray());
    validateViewObject1.executeQuery();


    /* validateViewObject1.setWhereClauseParam(0, projectId);
    validateViewObject1.setWhereClauseParam(1,sDate);
    validateViewObject1.setWhereClauseParam(2,eDate);
    validateViewObject1.executeQuery(); */

    //validateViewObject1.reset();

//oracle.jbo.Row validaterow = validateViewObject1.first();

    OAViewObject vo = (OAViewObject)am.findViewObject("AddProjectPartiesVO");
        AddProjectPartiesVORowImpl row = null;
        int fetchedRowCount = vo.getRowCount();
        RowSetIterator insertIter = vo.createRowSetIterator("insertIter");
       if (fetchedRowCount > 0)
        {
          insertIter.setRangeStart(0);
          insertIter.setRangeSize(fetchedRowCount);
       for (int i = 0; i < fetchedRowCount; i++)
        {  
          row = (AddProjectPartiesVORowImpl)insertIter.getRowAtRangeIndex(i);
          String existingDeliveryMgr = row.getAttribute(0).toString();   
          if(existingDeliveryMgr != resourceId)
          {
              //throw new OAException("Duplicate Delivery Manager Exist");
              MessageToken[] tokens = { new MessageToken(null, null)};
                  OAException exception =  new OAException("PA","DELIEVERY_MANAGER_ERR_MSG",tokens,OAException.ERROR,null);
              pageContext.putDialogMessage(exception);
          }
        }
          insertIter.closeRowSetIterator();

        }//outer if
}      
        validateViewObject1.remove();

}//apply close
}//method close


Integrating XML Publisher and OAF:Generating output in PDF, MSWord, MSExcel and HTML Format

It is a very common requirement where we want to generate reports in PDF, MSWord, MS Excel and HTML format from an OAF page itself without submitting any concurrent program.
To generate the output in PDF or other formats we need the following:
  • XML Data Definition, registered with Apps
  • Template, registered with Apps
  • XML Publisher APIs to process the template and generate the output in required format.
As we are going to generate the output from OAF, we need to generate the XML data using view object, View Object is having inbuilt functionality to read and write data in XML format. View Object is having one method called writeXML which will generate the data in XML format. We can use it for two purposes:
  1. To generate XML Data in Jdeveloper Embedded OC4J Sever Log (It will give XML Definition of data; we can use it for designing our Template and register this as Data definition).
  2. To generate XML data for actual template processing.
Steps to Generate the Output in required format:
Step 1: Create OAWorkspace, Project, packages, VO and AM (I hope you are already familiar with these)
Step 2: Import following Packages in AM and Controller:
import java.io.ByteArrayInputStream;
import java.io.ByteArrayOutputStream;
import javax.servlet.ServletOutputStream;
import javax.servlet.http.HttpServletResponse;
import oracle.apps.fnd.framework.webui.beans.table.OAAdvancedTableBean;
import oracle.apps.xdo.oa.schema.server.TemplateHelper;
import oracle.jbo.XMLInterface;
Step 3: Create one method in your AM to generate XML output, call this method from your processRequest mathod and get it printed on Jdeveloper console:
Your code for should look like this:
public void getPrintDataXML()
{
 try
 {
   ByteArrayOutputStream outputStream = new ByteArrayOutputStream();
   OAViewObject vo = (OAViewObject)am.findViewObject(“XXEGASRPrintPageVO1″);
   ((XMLNode) vo.writeXML(4, XMLInterface.XML_OPT_ALL_ROWS)).print(outputStream);
   System.out.println(outputStream.toString());
  }
 catch(Exception e)
 {
  throw new OAException (e.getMessage());
 }
}  
Statements highlighted(BOLD) will print the XML data generated by your view object to Jdeveloper console.
In first line vo.writeXML will generate the XML for VO and print method will write the XML data in outputstream that can further be used to print XML data on Jdeveloper console using println method.
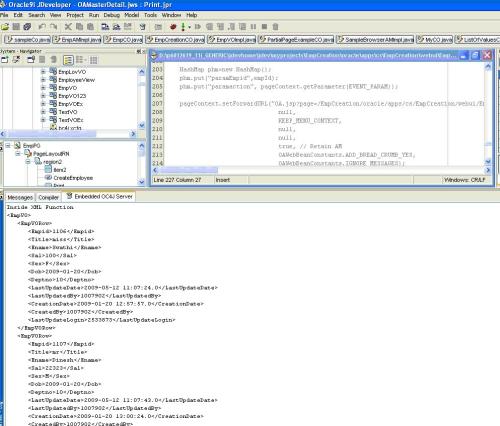
1
You can copy this output and save with some meaningful name and use it to register as data definition and to design your template(copy only XML data).
Step 4: Design your template
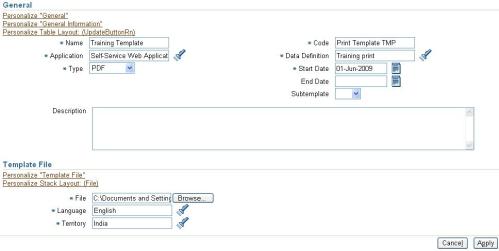
Step 5: Register your Template and data Definition in Oracle Apps
2
Step 5: Register your Template and data Definition in Oracle Apps
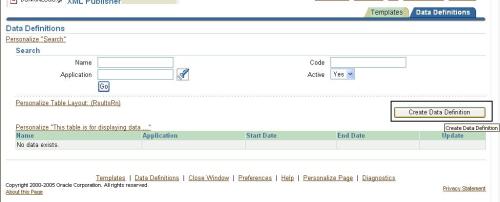
3
Click on “Create Data Definition” button
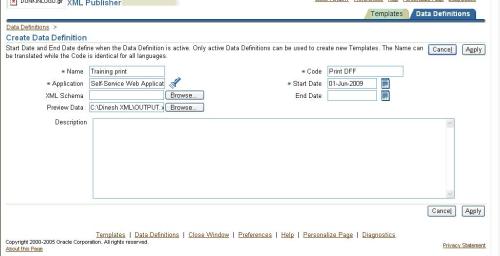
4
Fill in all the mandatory columns and give a short code for your data definition and clink on “Apply” button
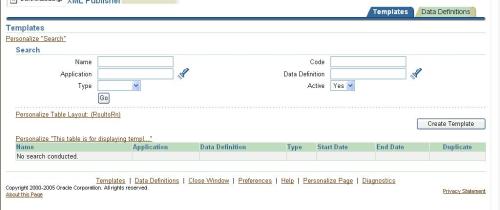
now click on “Template” Tab
5
 Click on “Create Template” button
6
Fill in all the mandatory columns and give a short code (It will be used by XML Publisher APIs to process the template) for your template and clink on “Apply” button
 Step 6: Generate output, using XML publisher APIs
    Step 6.1: Create a submit button to Generate the output say “Print”
     Step 6.2: Add following method to your AM Impl class
  public XMLNode getPrintDataXML()//XMLNode
  {
   OAViewObject vo = (OAViewObject)findViewObject(“EmpVO1″);
   ByteArrayOutputStream outputStream = new ByteArrayOutputStream();
   XMLNode xmlNode = (XMLNode) vo.writeXML(4, XMLInterface.XML_OPT_ALL_ROWS);
   return xmlNode;
  }
     Step 6.3: Handle the event for “Print” button:
 /*
 * Handles functionality of Print button
 */
 if(pageContext.getParameter(“btnPrint”)!=null)
               {
// Get the HttpServletResponse object from the PageContext. The report output is written to HttpServletResponse.
DataObject sessionDictionary = (DataObject)pageContext.getNamedDataObject(“_SessionParameters”);
 HttpServletResponse response = (HttpServletResponse)sessionDictionary.selectValue(null,”HttpServletResponse”);
                         try {
                          ServletOutputStream os = response.getOutputStream();
                           // Set the Output Report File Name and Content Type
                           String contentDisposition = “attachment;filename=PrintPage.pdf”;
                           response.setHeader(“Content-Disposition”,contentDisposition);
                           response.setContentType(“application/pdf”);
                           // Get the Data XML File as the XMLNode
                           XMLNode xmlNode = (XMLNode) am.invokeMethod(“getPrintDataXML”);
            ByteArrayOutputStream outputStream = new ByteArrayOutputStream();
            ByteArrayInputStream inputStream = new ByteArrayInputStream(outputStream.toByteArray());
            ByteArrayOutputStream pdfFile = new ByteArrayOutputStream();
            //Generate the PDF Report.
            //Process Template
            TemplateHelper.processTemplate(
            ((OADBTransactionImpl)pageContext.getApplicationModule(webBean).getOADBTransaction()).getAppsContext(),
            “AK”,//APPLICATION SHORT NAME
            “Print Template TMP”, //TEMPLATE_SHORT_CODE
            ((OADBTransactionImpl)pageContext.getApplicationModule(webBean).getOADBTransaction()).getUserLocale().getLanguage(),
            ((OADBTransactionImpl)pageContext.getApplicationModule(webBean).getOADBTransaction()).getUserLocale().getCountry(),
            inputStream,
            TemplateHelper.OUTPUT_TYPE_PDF,
            null,
            pdfFile);
              //TemplateHelper.
            // Write the PDF Report to the HttpServletResponse object and flush.
            byte[] b = pdfFile.toByteArray();
            response.setContentLength(b.length);
            os.write(b, 0, b.length);
            os.flush();
            os.close();
    pdfFile.flush();
    pdfFile.close();
            }
            catch(Exception e)
            {
            response.setContentType(“text/html”);
            throw new OAException(e.getMessage(), OAException.ERROR);
            }
            pageContext.setDocumentRendered(true);
            } 
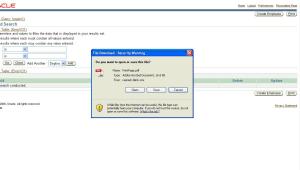
Now run your page and click on Print button:
7
In this manner we can generate the output in Excel, Word and HTML format also but we need to modify our code a bit, few statements in above code are in BOLD…
The statements in BOLD need to be modified:
First file name in following statement :
String contentDisposition = “attachment;filename=PrintPage.pdf”;
In above statement PrintPage.pdf  can be  replaced with <userdefined_filename>.doc/.xls/.htm
Second is file MIME Type needs to be changed:
response.setContentType(“application/pdf”);
Here application/pdf can be replaced with valid MIME type for Excel/Word and HTML
Third, TemplateHelper.OUTPUT_TYPE_PDF, in this OUTPUT_TYPE_PDF can be replaced by OUTPUT_TYPE_HTML/ OUTPUT_TYPE_EXCEL/ OUTPUT_TYPE_RT

Friday, 14 October 2011

Project Accounting Main Tables

The below are useful important Oracle Project Accounting tables

Table Name Description
============================================
PA_PROJECTS_ALL Information about projects
PA_AGREEMENTS_ALL Customer contracts that serve as the basis for work authorization
PA_BILL_RATES_ALL Information about bill rates and markups of standard bill rate schedules
PA_BILLING_ASSIGNMENTS_ALL Assignments of billing extensions to a project type, project, or task
PA_COST_DISTRIBUTION_LINES_ALL Information about expenditure item cost distribution
PA_CUST_REV_DIST_LINES_ALL Information about expenditure item revenue distribution
PA_DRAFT_INVOICE_DETAILS_ALL Intercompany invoice details for cross charged transactions
PA_DRAFT_INVOICES_ALL Information about draft invoices generated for projects
PA_DRAFT_REVENUES_ALL Information about draft revenue generated for projects
PA_EXPENDITURE_COST_RATES_ALL Cost rates for non-labor expenditure types
PA_EXPENDITURE_GROUPS_ALL Groups of pre-approved expenditures
PA_EXPENDITURE_ITEMS_ALL The smallest units of expenditure charged to projects and tasks
PA_EXPENDITURES_ALL Groups of expenditure items incurred by employees or organizations for an expenditure period
PA_PERIODS_ALL Implementation-defined periods against which project performance is measured
PA_PROJECT_ASSET_LINES_ALL Summarized project CIP costs
PA_PROJECT_ASSETS_ALL Assets defined for capital projects
PA_EXPENDITURE_TYPES Implementation-defined classifications of expenditures charged to projects and tasks
PA_EXPENDITURE_CATEGORIES Implementation-defined groupings of expenditure types by type of cost
PA_CLASS_CATEGORIES Implementation-defined categories for classifying projects
PA_CLASS_CODES Implementation-defined values within class categories that can be used to classify projects
PA_PROJECT_CLASSES Class codes of class categories that are used to classify projects
PA_BUDGET_VERSIONS Versions of project budgets
PA_BUDGET_LINES Detail lines of project and task budgets


Note:  For More Tables:
Visit the following Link
http://oracleappscommunity.com/oracle/blog/1156/oracle-projects-tables/

Passing parameters from one OAF page to another OAF PAge

// processFormRequest()
HashMap hm = new HashMap(1);
hm.put("myParam", "myParamVal");
oapagecontext.setForwardURL("MY_FUNCTION", (byte)0, null, hm, true, "N", (byte)0);

You can then retrieve this parameter in processRequest() via:
oapagecontext.getParameter("myParam")

Delete Operation in oaf...when we pressing the delete icon in the page


In the CO type the following:

//"delete" is the Event raised when you press the Delete Icon in Invoice
//Lines
//So check if the Delete icon has been pressed.

else if ("delete".equals(pageContext.getParameter(OAWebBeanConstants.EVENT_PARAM)))
{
//get the Unique Row Reference for the Row on which the Even has been
//generated.
String lineRefId = (String)pageContext.getParameter(OAWebBeanConstants.EVENT_SOURCE_ROW_REFERENCE);
Serializable [] param={lineRefId};
//Call the AM method deleteInvoiceLine to delete the Invoice Lines
am.invokeMethod("deleteInvoiceLine",param);

}
In the AM type the following

//method in the AM
public void deleteInvoiceLine(String lineRefId){
//Find the LineVORowImpl using the Unique Row
// Reference
LineVORowImpl lineRow = (LineVORowImpl)findRowByRef(lineRefId);

lineRow.remove();

}
Finally commit to save the changes to the database

Returns a date string in the users date format

 /*
     * Returns a date string in the users date format
     *
     * @param nlsServ instance of OANLSServices
     * @param dateStr string in 'dd-mm-yyyy' format
     */
    public static String stringToDateString(OANLSServices nlsServ, String dateStr) {

      if (dateStr != null && !dateStr.equals(""))
      {
        Date date = null;
        if (databaseDateFormat != null) {
          try {
            date = databaseDateFormat.parse(dateStr);
          } catch (ParseException e) {
          }
        }

        if (date != null)
          return nlsServ.dateToString(date);
      }

      return null

Create Tip Messages

Personalize the page:
The output will look like:


Second type of Tip Message:
And the output:

Call Function in OAF

The segment below calls a custom function with 1 input parameter of type Varchar and returns a Varchar :

   OAApplicationModule oam = pageContext.getApplicationModule(webBean); 

   String sql =   "BEGIN :1 := xx_custom_pkg.call_custom_function (:2); END;";

  OracleCallableStatement cs =
                            (OracleCallableStatement)oam.getOADBTransaction().createCallableStatement(sql,2);

                        try {
                             //Register your function output...
                            cs.registerOutParameter(1, Types.VARCHAR, 0, 2000);
                            //Your input parameter below...
                            cs.setString(2, LinesRow.getAttribute("ReportLineId").toString());
                            cs.execute();
                            String p_res = cs.getString(1);
                            cs.close();       
                            }
                        catch (Exception ex) {
                                        pageContext.writeDiagnostics(this,
                                                                     "Error:" + ex.toString(),
                                                                     OAFwkConstants.PROCEDURE);
                           }                    

Call Procedure in OAF (2 input parameters)

Call a custom procedure. Two input parameters of type Varchar:
 OAApplicationModule oam =  pageContext.getApplicationModule(webBean);

 String sql =  "BEGIN xx_custom_pkg.custom_prc (:1,:2); END;";
                    try {
                        OracleCallableStatement cs =
                            (OracleCallableStatement)oam.getOADBTransaction().createCallableStatement(sql,
                                                                                                      2);
                        cs.setString(1, xxAttribute1Value);
                        cs.setString(2, xxAttribute2Value);
                        cs.execute();
                        cs.close();
                      }
                 catch (Exception ex) {
                        pageContext.writeDiagnostics(this,
                                                     "Error:" + ex.toString(),
                                                     OAFwkConstants.PROCEDURE);
                    }

Call Procedure in OAF (1 input, 1 output parameter)

String sql = "BEGIN xx_custom_pkg.custom_prc (:1,:2); END;";
            try {
                OracleCallableStatement cs =
                    (OracleCallableStatement)oam.getOADBTransaction().createCallableStatement(sql,
                                                                                              2);
                ((OracleCallableStatement)cs.registerOutParameter(2,
                                                                  Types.VARCHAR,
                                                                  0, 2000));
                cs.setString(1, xxAttribute1Value);
                cs.execute();
                String outParamValue = cs.getString(1);
                pageContext.writeDiagnostics(this,
                                             "Result is:" + outParamValue,
                                             OAFwkConstants.PROCEDURE);
                cs.close();
            } catch (Exception ex) {
                pageContext.writeDiagnostics(this, "Error:" + ex.toString(),
                                             OAFwkConstants.PROCEDURE);
            }

Add Processing Page Access to Launching Page

In the page that initiates the long-running process, add code to instantiate and navigate to the processing page
as shown in the example below.  (Taken from Oracle Developers Guide)

import oracle.apps.fnd.framework.webui.OAProcessingPage;

public void processFormRequest(OAPageContext pageContext, OAWebBean webBean)
{
   super.processFormRequest(pageContext, webBean);

   // This example assumes a submit button named "StartProcess" initiates the long-running process.
   if (pageContext.getParameter("StartProcess")!= null) 
   {
     // Create the processing page and pass it the fully qualified name of the controller that
     // you created to launch the process.
     OAProcessingPage page =  new
OAProcessingPage("oracle.apps.fnd.toolbox.samplelib.webui.processCO");

     // The concise message is displayed in bold and should briefly describe the process.
     // NOTE: never hard-code text display values as shown here.  Always use message dictionary.     
     page.setConciseMessage("This is the concise processing page message.");

     // The detailed message displays below the concise message in plain text.  It provides
     // additional information about what's happening.
     page.setDetailedMessage("This is the detailed message which should explain what's happening.");

     // This is displayed in the processing page title.
     page.setProcessName("<Process Name>");

     // Forward to the processing page.  Note that the OA Framework assumes you
   //  are retaining  the root application module.  Since we haven't specified a different root AM on
     // the processing page, the OA Framework assumes it uses the same root AM as the launching page.
     pageContext.forwardToProcessingPage(page); 
   }
}

Forward to a New Page

This code requires you to setup a new function with name XXX_CUSTOM_PAGE, specify the complete path and assign this function to your responsibility.
 
String AuctionHeaderId = ReqRow.getAttribute("AuctionHeaderId").toString();
String BidNumber = ReqRow.getAttribute("BidNumber").toString();

HashMap hm = new HashMap(2);
hm.put("AuctionHeaderIdParam", AuctionHeaderId.toString());
hm.put("BidNumberParam", BidNumber.toString());

pageContext.setForwardURL("XXX_CUSTOM_PAGE", KEEP_MENU_CONTEXT, null,
  hm, false, ADD_BREAD_CRUMB_YES, IGNORE_MESSAGES);

Oracle Applications Framework Profiles

Profile Name :Personalize Self-Service Defn
– Yes enables personalization link on all pages..This should be no in Production environment. For development team also it is better to set it yes at the user level

       Profile Name: FND: Personalization Region Link Enabled
– Yes displays all regional links
– Minimal displays key regional links
It is better to set the personalize link at the region level
       Profile Name :Disable Self-Service Personal
– Turn off all personalization
       Profile Name: FND: Personalization Document Root Path
– Used for importing/exporting personalization
       Profile Name: FND: Diagnostics
– Enables diagnostics on top right corner of the page

Create new button programatically

The following code requires you to setup a new custom message in Applications (Application Developer Responsibility) with name XXX_CUSTOM_MSG_BUTTON.


OASubmitButtonBean oasb =
    (OASubmitButtonBean)pageContext.getWebBeanFactory().createWebBean(pageContext,
                                                                      "BUTTON_SUBMIT");
oasb.setID("xxCustomButton");
oasb.setUINodeName("xxCustomButton");
oasb.setEvent("xxCustomButton");

String printTextMsg = pageContext.getMessage("XXX","XXX_CUSTOM_MSG_BUTTON",null);
oasb.setText(printTextMsg);
oawebbean.addIndexedChild(oasb);

Get Current Language

This code gets the system current language:

if (pageContext.getCurrentLanguage().equals("US"))
{
}

Compare Dates

The following code will help you compare 2 dates in OAF.You should write this in your extended controller:

                 Date out_date = null;

                 rootAM =  pageContext.getRootApplicationModule();
                
                 ReqHVO =  (OAViewObject)rootAM.findViewObject("AuctionHeadersAllVO");
                
                 ReqRow = ReqHVO.first();
                                                                            
                 out_date = (Date)ReqRow.getAttribute("CloseBiddingDate");
                
                 OAApplicationModule am = pageContext.getApplicationModule(webBean);
                 SimpleDateFormat f = new SimpleDateFormat("yyyy-MM-dd hh:mm:ss");
                 Date current_date = am.getOADBTransaction().getCurrentDBDate();
               
                if (out_date.getValue().getTime() > current_date.getValue().getTime()) {
}

Launch a Workflow from OAF

public void launchWorkFlowFromOAF(OAPageContext pageContext)

{

String wfItemType = "XXSR";

String wfProcess = "SR_MAIN_PROCESS";

OADBTransaction transaction = getOADBTransaction();

String Sr_No ;

String wfItemKey = " ";

Sr_No = pageContext.getParameter("sr_no");

wfItemKey = Sr_No+ transaction.getSequenceValue("xxsr_key_s.NEXTVAL").toString();

OANavigation wfClass = new OANavigation();

// Create Workflow Process

wfClass.createProcess(pageContext, wfItemType, wfProcess, wfItemKey);

// Set Number Attribute: SR_NO

wfClass.setItemAttrNumber(pageContext,
                          wfItemType,
                          wfItemKey,
                          "SR_NO",
                          Sr_No);

// Start Workflow Process

wfClass.startProcess(pageContext, wfItemType, wfProcess, wfItemKey);

}